GCDXN7 CTF - Official Challenges Writeup
Note: This writeup covers the challenges I created for GCDXN7 CTF. All solutions are provided for educational purposes to help players learn and improve their skills.
Introduction
As a challenge creator for GCDXN7 CTF, I designed 9 challenges across multiple categories. This writeup provides detailed solutions and explanations for each challenge to help players understand the concepts and techniques involved.
Role: Challenge Creator
Challenges Created: 6 Reverse Engineering + 2 OSINT + 1 Misc
Total Challenges: 9
🔧 Reverse Engineering Challenges
These are the 6 reverse engineering challenges I designed and created for the CTF.
Challenge 1: Baby Rev
Solves: 23
Category: Reverse Engineering
Difficulty: Beginner
Description
khodo hada ka gift w good luck ;)
(Translation: Take this as a gift and good luck!)
Attachment: baby_rev.exe
Solution
This challenge serves as a gentle introduction to reverse engineering Windows executables. Let’s walk through the solution step by step.
Step 1: Initial Analysis
First, let’s identify what we’re dealing with:
1
2
$ file baby_rev.exe
baby_rev.exe: PE32+ executable for MS Windows 5.02 (console), x86-64, 18 sections
We have a 64-bit Windows console application. When we run it, the program prompts us to enter a flag and checks if it’s correct.
Step 2: Decompiling with Ghidra
Opening the executable in Ghidra and analyzing the main function, we see:
1
2
3
4
5
6
7
8
9
10
11
12
13
14
15
16
17
18
19
20
21
22
int __cdecl main(int _Argc, char **_Argv, char **_Env)
{
  // ... variable declarations ...

  std::operator<<((ostream *)&_ZSt4cout,"===================================\n");
  std::operator<<((ostream *)&_ZSt4cout,"  Baby Reverse Engineering Challenge\n");
  std::operator<<((ostream *)&_ZSt4cout,"===================================\n\n");
  std::operator<<((ostream *)&_ZSt4cout,"Enter the flag: ");
  std::getline<>((istream *)&_ZSt3cin,local_58);

  // Remove spaces from input
  // ...

  uVar3 = check_password();
  if (bVar4) {
    std::operator<<((ostream *)&_ZSt4cout,"\n[-] Wrong flag. Try harder!\n");
  }
  else {
    std::operator<<((ostream *)&_ZSt4cout,"\n[+] Correct! Well done!\n");
  }
  return (uint)bVar4;
}
The program takes user input, removes spaces, and calls a check_password() function to validate it.
Step 3: Analyzing the Password Check
The interesting part is in the check_password() function:
1
2
3
4
5
6
7
8
9
10
11
12
13
14
15
16
17
18
19
20
21
22
23
ulonglong check_password(void)
{
  // ... variable declarations ...

  // Hardcoded encrypted data
  local_78 = 0x31a562f19252226;
  local_70 = 0x355;
  uStack_6e = 0x3e1752133e18;
  uStack_68 = 0x902;
  local_66 = 0x1c52060f520d0d55;
  local_1c = 0x1a;  // length = 26 bytes

  // Copy to buffer
  memcpy(local_98, &local_78, 0x1a);
  local_98[local_1c] = '\0';

  // XOR decrypt with key 0x61 ('a')
  xor_encrypt((longlong)local_98, local_1c, 0x61);

  // Compare with user input
  uVar1 = std::operator==();
  return uVar1 & 0xffffffff;
}
Key observations:
- There’s hardcoded encrypted data stored as integers
- The data is XOR-ed with key
0x61(the ASCII value of ‘a’) - The result is compared with our input
Step 4: Writing the Solver
Since we know the encrypted data and the XOR key, we can decrypt it ourselves:
1
2
3
4
5
6
7
8
9
10
11
12
13
14
15
16
17
18
19
20
21
22
#!/usr/bin/env python3

# Encrypted data from the binary (little-endian format)
ints = [
    (0x31a562f19252226, 8),   # local_78
    (0x355,             2),   # local_70
    (0x3e1752133e18,    6),   # uStack_6e
    (0x902,             2),   # uStack_68
    (0x1c52060f520d0d55,8)    # local_66
]

# Build encrypted buffer (little-endian for each value)
enc = b''.join(v.to_bytes(length, 'little') for v, length in ints)
enc = enc[:26]  # Ensure exact length (26 bytes)

KEY = 0x61  # XOR key: 'a'

# XOR decrypt
dec = bytes(b ^ KEY for b in enc)

# Output the flag
print("Flag:", dec.decode('latin-1'))
Running this script gives us the flag!
TL;DR for Experienced Players
PE32+ x64 executable with flag validation. The check_password() function contains hardcoded encrypted bytes that are XOR-ed with key 0x61 (‘a’) and compared to user input. Extract the constants, convert from little-endian, XOR decrypt, and you get the flag. Classic beginner XOR challenge.
Flag: GCDxN7{b4by_r3v_ch4ll3ng3}
Challenge 2: Ach Hada?
Solves: 31
Category: Reverse Engineering
Difficulty: Easy
Description
sa7bi sift liya hadchi w gal liya 3awni n3rf ach tydir. chof ki dir.
(Translation: My friend sent me this and asked for help to see what this does. See what you can do.)
Attachments: code.ps1, output.txt
Solution
This challenge introduces obfuscated PowerShell scripting and requires understanding basic cryptographic operations. Let’s break it down step by step.
Step 1: Analyzing the Obfuscated Code
We’re given a heavily obfuscated PowerShell script:
1
${x}=+!!@{}+!(&{})+!$();${y}=${x}*${x}+!!@{};${z}=${y}+${x}*(!@{}+!!$());${s}='';(g''eT-c""OnT''ent "flag.txt" -Raw).Trim().ToCharArray()|%{${s}+=[char](([int]$_*${x}+${y})%([int]'0x100'))};${r}=@();for(${i}=+!!@{}*+!@{};${i}-lt${s}.Length;${i}+=+!!@{}){${m}=${i}%${x};${r}+=((([int][char]${s}[${i}])+${z}+${m}*${y})%([int]'0x100'))};${r}
At first glance, this looks like gibberish! But PowerShell obfuscation often uses boolean logic tricks to hide simple numbers.
Step 2: Deobfuscating the Variables
Let’s decode the key variables:
1
${x} = +!!@{} + !(&{}) + !$()
Breaking this down:
!!@{}- Double negation of empty hashtable =True=1!(&{})- Negation of empty scriptblock =True=1!$()- Negation of empty subexpression =True=1- Result:
x = 1 + 1 + 1 = 3
Similarly:
y = x * x + !!@{} = 3 * 3 + 1 = 10z = y + x * (!@{} + !!$()) = 10 + 3 * (0 + 0) = 10- Note:
!@{}is False (empty hashtable is truthy) and!!$()is False (empty subexpression double-negated)
- Note:
Step 3: Understanding the Encryption Algorithm
Once deobfuscated, the script:
- Reads
flag.txt - Applies a first transformation:
(char_value * 3 + 10) % 256 - Applies a second transformation with position-dependent modifier:
(value + z + (position % 3) * 10) % 256
The output in output.txt contains the encrypted values:
1
233, 231, 244, 124, 8, 205, 133, 101, 75, 112, 86, 69, 85, 86, 75, 127, 68, 69, 76, 65, 84, 49, 98, 147, 55, 101, 69, 127, 65, 105, 49, 219, 159
Step 4: Reversing the Encryption
To decrypt, we need to reverse both transformations. The tricky part is reversing the multiplication by 3 modulo 256.
We need the modular multiplicative inverse of 3 modulo 256, which is 171 (because 3 * 171 ≡ 1 (mod 256)).
Here’s the decryption script:
1
2
3
4
5
6
7
8
9
10
11
12
13
14
15
16
17
18
19
20
21
22
# decrypt.ps1
$r = @(233,231,244,124,8,205,133,101,75,112,86,69,85,86,75,127,68,69,76,65,84,49,98,147,55,101,69,127,65,105,49,219,159)

$x = 3
$y = 10
$z = 10
$inv3 = 171  # Modular inverse of 3 mod 256

$chars = for ($i=0; $i -lt $r.Length; $i++) {
    $m = $i % $x  # Position-dependent modifier

    # Reverse second transformation
    $val = ($inv3 * (($r[$i] - $y - $z - ($m * $y)) % 256)) % 256

    # Handle negative values
    if ($val -lt 0) { $val += 256 }

    [char]$val
}

$flag = -join $chars
$flag
Key concepts explained:
- Modular arithmetic - All operations use
% 256to keep values in byte range - Position-dependent encryption - The modifier
mchanges based on character position - Modular inverse - To reverse multiplication by 3, we multiply by 171
Running this script reveals the flag!
TL;DR for Experienced Players
Obfuscated PowerShell script that reads a file and applies two-layer encryption: ((char*3+10)%256 + z + (pos%3)*10)%256. Boolean logic obfuscation hides constants (x=3, y=10, z=10). Reverse with modular inverse of 3 (171) and work backwards through the transformations. Classic PowerShell deobfuscation + basic modular arithmetic challenge.
Flag: GCDxN7{math_khayb_had_lyam_yak_?}
Challenge 3: Kitab Lwasaft
Solves: 11
Category: Reverse Engineering
Difficulty: Easy
Description
had l app hadi fiha cake recipes wlkin wa9ila kayna chi haja mkhb3a ??
(Translation: This app contains cake recipes and maybe something is hiding there?)
Attachment: kitab_lwasaft.apk
Solution
This challenge introduces Android reverse engineering and teaches how to analyze APK files. Let’s explore how to find the hidden flag.
Step 1: Initial Analysis
We’re given an Android APK file. APK files are essentially ZIP archives containing the application code, resources, and assets. To reverse engineer it, we’ll use JADX-GUI, a popular decompiler for Android applications.
1
2
$ file kitab_lwasaft.apk
kitab_lwasaft.apk: Zip archive data
Step 2: Decompiling with JADX
Open the APK in JADX-GUI and navigate to the MainActivity class. Here’s the interesting part of the decompiled code:
1
2
3
4
5
6
7
8
9
10
11
12
13
14
15
16
17
18
19
20
21
22
23
24
25
26
27
28
29
30
31
32
33
34
35
36
37
38
39
40
package com.gcdxn7.kitab_lwasafat;

import android.os.Bundle;
import androidx.appcompat.app.AppCompatActivity;
import androidx.recyclerview.widget.RecyclerView;
import java.util.ArrayList;
import java.util.List;

public class MainActivity extends AppCompatActivity {

    @Override
    protected void onCreate(Bundle savedInstanceState) {
        super.onCreate(savedInstanceState);
        setContentView(R.layout.activity_main);

        // Setup cake list...
        List<Cake> cakes = getCakeList();
        // Display cakes in RecyclerView...
    }

    private List<Cake> getCakeList() {
        List<Cake> cakes = new ArrayList<>();
        cakes.add(new Cake("Chocolate Cake", "Rich and moist chocolate cake", R.drawable.asfvvvwe_cake));
        cakes.add(new Cake("Vanilla Cake", "Classic vanilla sponge cake", R.drawable.ckaubwasc_cake));
        cakes.add(new Cake("Red Velvet", "Smooth red velvet with cream cheese", R.drawable.khchjcwqd_velvet));
        cakes.add(new Cake("Carrot Cake", "Spiced carrot cake with walnuts", R.drawable.jhwvfegw_cake));
        cakes.add(new Cake("Lemon Cake", "Fresh lemon cake with glaze", R.drawable.casjydvwq_cake));
        cakes.add(new Cake("Strawberry Cake", "Sweet strawberry layered cake", R.drawable.kwugvcqwd_cake));

        // Hidden flag cake!
        if (shouldShowFlagCake()) {
            cakes.add(new Cake("Flag Cake", "bravoo", R.drawable.asdnasdcg_cake));
        }
        return cakes;
    }

    private boolean shouldShowFlagCake() {
        return false;  // Always returns false!
    }
}
Step 3: Discovering the Hidden Flag Cake
Notice something interesting? There’s a “Flag Cake” that gets added to the list only if shouldShowFlagCake() returns true. But the function always returns false!
This means the flag cake is in the app but will never be displayed under normal circumstances. We have a few options:
- Patch the APK - Modify the bytecode to make
shouldShowFlagCake()returntrue - Use Frida - Hook the function at runtime to change its return value
- Extract resources directly - Look for the referenced image in the APK
Step 4: Finding the Flag Image
The easiest approach is to extract the resources directly. The flag cake references R.drawable.asdnasdcg_cake, which means there’s an image file in the APK’s resources.
Navigate to res/drawable/ in JADX or extract the APK:
1
2
3
4
$ apktool d kitab_lwasaft.apk -o extracted
$ cd extracted/res/drawable/
$ ls | grep asdnasdcg
asdnasdcg_cake.png
Step 5: Examining the Image
Open asdnasdcg_cake.png and you’ll find the flag embedded directly in the image!
TL;DR for Experienced Players
Android APK with hidden “Flag Cake” that only appears if shouldShowFlagCake() returns true (but it always returns false). Flag is embedded in the referenced drawable R.drawable.asdnasdcg_cake. Extract resources from APK and check the image.
Flag: GCDxN7{mr7ba_bik_f_android_rev}
Alternative Method - Strings (Unintended Solution)
An even easier approach is to simply run strings on the APK file:
1
2
$ strings kitab_lwasaft.apk | grep GCDxN7
GCDxN7{mr7ba_bik_f_android_rev}
The flag appears in the output because it’s stored in the image metadata! This is a common mistake when hiding flags in images - metadata often contains text that’s easily extractable.
Challenge 4: Kitab Lwasaft 2
Solves: 1
Category: Reverse Engineering
Difficulty: Medium
Description
wach 39lto 3la farida f mosalsal sam7ini ?
hada kmala dyal kitab lwasafat ya3ni khdmo b nafs l apk(Translation: Do you remember Farida from the “Sam7ini” (Forgive Me) series?
This is a continuation of the previous challenge, you’ll need to use the same APK)
Attachment: Same kitab_lwasaft.apk from Challenge 3
Solution
This challenge builds on the previous one and introduces native code analysis and dynamic instrumentation with Frida. The hint about “Farida” is a wordplay on “Frida,” the dynamic instrumentation toolkit!
Step 1: Discovering the Native Code
Going back to the APK in JADX, we notice something interesting in MainActivity:
1
2
3
4
5
6
7
8
public class MainActivity extends AppCompatActivity {
    public native String generateFlag(String str);

    static {
        System.loadLibrary("native-lib");
    }
    // ...
}
There’s a native method generateFlag() that takes a string parameter and returns a flag! Native methods are implemented in C/C++ and compiled into shared libraries (.so files).
Step 2: Analyzing CakeDetailActivity
Looking at CakeDetailActivity, we see the native method being called:
1
2
3
4
5
6
7
8
9
10
11
12
13
14
15
16
17
18
19
20
21
22
23
24
25
26
27
28
29
30
31
public class CakeDetailActivity extends AppCompatActivity {
    public native String generateFlag(String str);

    @Override
    protected void onCreate(Bundle savedInstanceState) {
        // ... setup code ...

        String appKey = getAppSecretKey();
        generateFlag(appKey);  // Flag is generated but never displayed!
    }

    private String getAppSecretKey() {
        // Derives a key from the APK signature
        PackageInfo packageInfo = getPackageManager().getPackageInfo(getPackageName(), 64);
        Signature signature = packageInfo.signatures[0];
        MessageDigest md = MessageDigest.getInstance("SHA-256");
        md.update(signature.toByteArray());
        byte[] digest = md.digest();

        // Takes first 16 bytes and converts to hex
        StringBuilder hexString = new StringBuilder();
        for (int i = 0; i < Math.min(16, digest.length); i++) {
            String hex = Integer.toHexString(digest[i] & 0xFF);
            if (hex.length() == 1) {
                hexString.append('0');
            }
            hexString.append(hex);
        }
        return hexString.toString();
    }
}
The key insights:
- A secret key is derived from the APK’s signature (SHA-256 hash)
- This key is passed to
generateFlag() - The flag is generated but never displayed or stored!
Step 3: Static Analysis of Native Library
Extract the native library from the APK:
1
2
3
4
$ apktool d kitab_lwasaft.apk -o extracted
$ cd extracted/lib/arm64-v8a/  # or x86_64 depending on arch
$ file libnative-lib.so
libnative-lib.so: ELF 64-bit LSB shared object, ARM aarch64
Opening it in Ghidra or IDA reveals over 13,000 lines of obfuscated code with:
- ROT operations
- XOR encryption
- Bit shifting
- Custom obfuscation techniques
- and more…
This is intentionally too complex for static analysis!
Step 4: Dynamic Analysis with Frida (Intended Solution)
The hint “Farida” points us to Frida, a dynamic instrumentation framework that lets us hook functions at runtime!
Setup Steps:
1. Install Frida tools on your computer:
1
pip install frida-tools
2. Download and push Frida server to your Android device:
1
2
3
4
5
6
7
8
# Download frida-server from GitHub releases (match your device architecture)
# For ARM64:
wget https://github.com/frida/frida/releases/download/16.1.4/frida-server-16.1.4-android-arm64.xz
unxz frida-server-16.1.4-android-arm64.xz

# Push to device
adb push frida-server-16.1.4-android-arm64 /data/local/tmp/frida-server
adb shell "chmod 755 /data/local/tmp/frida-server"
3. Start Frida server on the device:
1
2
3
4
adb shell
su  # Need root
/data/local/tmp/frida-server &
exit
4. Install the APK on your device:
1
adb install kitab_lwasaft.apk
Step 5: Writing the Frida Hook Script
Create a file named flag2_hook.js:
1
2
3
4
5
6
7
8
9
10
11
12
13
14
15
16
17
18
Java.perform(function() {
    try {

        // Hook CakeDetailActivity's generateFlag
        var CakeDetailActivity = Java.use("com.gcdxn7.kitab_lwasafat.CakeDetailActivity");

        CakeDetailActivity.generateFlag.implementation = function(key) {
            var flag = this.generateFlag(key);
            console.log("[+] FLAG 2: " + flag);
            return flag;
        };

        console.log("[*] Hook installed successfully!");

    } catch (e) {
        console.log("[!] Error: " + e);
    }
});
Step 6: Running Frida and Capturing the Flag
Run Frida with the script:
1
frida -U -f com.gcdxn7.kitab_lwasafat -l flag2_hook.js
Explanation of flags:
-U- Use USB device-f- Spawn the app (start it fresh)-l- Load the JavaScript hook file
Now interact with the app on your device. Open any cake recipe to trigger CakeDetailActivity, and Frida will intercept the generateFlag() call and print the flag!
Output:
1
2
[*] Hook installed successfully!
[+] FLAG 2: GCDxN7{ki_jatk_frida_zwina_wla_la??}
TL;DR for Experienced Players
Native library challenge with generateFlag() method that takes APK signature-derived key and returns flag. Native lib has 13k lines of obfuscated code (intentionally unsolvable statically). Use Frida to hook the Java-level generateFlag() method in CakeDetailActivity at runtime. The hint “Farida” → Frida. Classic dynamic instrumentation challenge teaching when to abandon static RE and go dynamic.
Flag: GCDxN7{ki_jatk_frida_zwina_wla_la??}
Challenge 5: Mokhadi3
Solves: 0
Category: Reverse Engineering
Difficulty: Hard
Description
ghir 7al 3inik w ntabh w ghadi tl9ah sahl
(Translation: Just open your eyes and you’ll find the challenge pretty easy)
Attachment: challenge.exe
Solution
This challenge teaches an important lesson in reverse engineering: sometimes the answer is hiding in plain sight! Despite appearing complex, the solution is simpler than it seems.
Step 1: Initial Analysis
First, let’s identify what we’re dealing with:
1
2
3
4
5
6
$ file challenge.exe
challenge.exe: PE32+ executable for MS Windows 6.01 (console), x86-64, 3 sections

$ ./challenge.exe
Enter the flag: test
Wrong.
Running it in Detect It Easy (DiE) reveals something important:
1
2
3
$ diec challenge.exe
PE64
    Packer: UPX(4.24)[NRV,brute]
The binary is packed with UPX! This is a common technique to compress executables and make them harder to analyze.
Step 2: Unpacking the Binary
Since the binary is UPX-packed, we need to unpack it first for easier analysis:
1
2
3
4
5
6
7
8
9
10
11
$ upx -d challenge.exe
                       Ultimate Packer for eXecutables
                          Copyright (C) 1996 - 2024
UPX 4.2.4       Markus Oberhumer, Laszlo Molnar & John Reiser    May 9th 2024

        File size         Ratio      Format      Name
   --------------------   ------   -----------   -----------
   1821184 <-    769536   42.25%    win64/pe     medium_rev.exe

Unpacked 1 file.
Now we have the unpacked version ready for analysis in Ghidra.
Step 3: Finding the Validation Logic
Open the binary in Ghidra. To quickly locate the interesting code, use the Search → For Strings feature and search for "Wrong.":
1
DAT_1400e311b: "Wrong."
Follow the cross-references (XREFs) to find where this string is used. This leads us to a pointer table at PTR_DAT_14010ebe0, and following that XREF again brings us to the main function FUN_1400a97c0.
The main function’s logic can be simplified to:
1
2
3
4
5
6
7
// Simplified pseudocode
if (check_flag() == false) {
    print("Wrong.");
    exit(1);
} else {
    print("Correct!");
}
The key function is FUN_1400a87c0, which performs the actual flag validation.
Step 3: Analyzing the Check Function
The validation function FUN_1400a87c0 is interesting, it calls 17 different sub-functions in a loop:
1
2
3
4
5
6
for (int i = 0; i < 0x12; i++) {  // 0x12 = 18 functions (0-17)
    if (!check_functions[i]()) {
        return 0;  // Fail
    }
}
return 1;  // Success
Each function performs a different check on the input. While you could reverse each one individually, that’s tedious. Let’s look for shortcuts!
Step 4: The Hidden Gem - Function 8
Looking through the validation functions, the 8th function (FUN_1400a90e0) is particularly interesting:
1
2
3
4
5
void FUN_1400a90e0(void) {
    // ... stack checks ...
    FUN_1400a7d00(input_ptr, input_length);
    return;
}
It calls FUN_1400a7d00, which contains this revealing code:
1
2
3
4
5
6
7
8
9
10
11
12
13
14
15
16
17
18
// Hardcoded encrypted data
buffer[0x67] = 0xDF;
*(uint16_t*)(buffer + 0x66) = 0xC9C9;
*(uint32_t*)(buffer + 100) = 0xD0CBC9C7;
*(uint64_t*)(buffer + 0x60) = 0xC9DFD4C7CCD69BC7;
*(uint64_t*)(buffer + 0x58) = 0xD1CCE1C9D5C7CC9F;
*(uint64_t*)(buffer + 0x50) = 0xD0C7D1CCC9D0C7DA;
*(uint64_t*)(buffer + 0x48) = 0xC9E1D6CCC7C9E1D1;

// Decrypt by adding 0x98 (or subtracting 0x68, equivalent)
for (int i = 0; i < 0x27; i++) {
    decrypted[i] = buffer[i] + 0x98;  // Same as buffer[i] - 0x68
}

// Compare with user input
if (memcmp(user_input, decrypted, length) != 0) {
    return 0;
}
This is it! The flag is hardcoded and encrypted with a simple XOR/addition operation!
Step 5: Extracting the Flag
We can write a simple Python script to decode the hardcoded values:
1
2
3
4
5
6
7
8
9
10
11
12
13
14
15
16
17
18
19
20
21
22
23
24
25
#!/usr/bin/env python3
# Extract and decode the hardcoded flag

writes = [
    (0xDF, 1),                    # 1 byte
    (0xC9C9, 2),                  # 2 bytes
    (0xD0CBC9C7, 4),              # 4 bytes
    (0xC9DFD4C7CCD69BC7, 8),      # 8 bytes
    (0xD1CCE1C9D5C7CC9F, 8),      # 8 bytes
    (0xD0C7D1CCC9D0C7DA, 8),      # 8 bytes
    (0xC9E1D6CCC7C9E1D1, 8),      # 8 bytes
]

# Build buffer in little-endian order
buf = bytearray()
for val, length in writes:
    buf += val.to_bytes(length, byteorder='little')

assert len(buf) == 0x27, "Expected 39 bytes"

# Apply transformation: subtract 0x68 from each byte
decoded = bytes((b - 0x68) & 0xff for b in buf)

print("Decoded flag content:")
print(decoded.decode('latin-1'))
Output:
1
waa_ach_3nd_lwa7d_maydir_hadi_hiya_dnya
Wrapping it in the flag format: GCDxN7{waa_ach_3nd_lwa7d_maydir_hadi_hiya_dnya}
The Challenge’s Message
The challenge name “mokhadi3” (hidden/deceptive) and the description telling you to “open your eyes” perfectly describe the solution! The flag wasn’t behind complex algorithms, it was literally hardcoded in the binary, just obfuscated with simple arithmetic.
Sometimes in reverse engineering, you don’t need to understand every function. Finding the right shortcut can save hours of work!
TL;DR for Experienced Players
UPX-packed PE64 binary with multi-stage flag validation. Instead of reversing all 17+ check functions, look at the 8th validation function which contains hardcoded encrypted bytes. Flag string is XOR-ed/offset by 0x68. Extract the hex constants from decompiled code, convert from little-endian, subtract 0x68, and you get the flag string. The challenge name and description literally tell you the solution is “hidden in plain sight”, classic misdirection where apparent complexity hides simple hardcoded data.
Flag: GCDxN7{waa_ach_3nd_lwa7d_maydir_hadi_hiya_dnya}
Challenge 6: tkhrbi9
Solves: 1
Category: Reverse Engineering
Difficulty: Hard
Description
kayna chi tkhrbi9a hna. chof ki dir
(Translation: There’s some mess here. See what you can do.)
Attachment: challenge.exe
Solution
This challenge presents a complex Go binary with multiple layers of obfuscation and validation. The flag is constructed from three distinct parts, each requiring different reverse engineering techniques to extract.
Step 1: Initial Analysis
First, let’s identify what we’re dealing with:
1
2
3
4
5
6
7
8
$ file challenge.exe
challenge.exe: PE32+ executable for MS Windows 6.01 (console), x86-64, 3 sections

$ ./challenge.exe
Usage: challenge <flag>

$ ./challenge.exe test
✗ Wrong flag. Try harder!
Running Detect It Easy (DiE) reveals important information:
1
2
3
4
$ diec challenge.exe
PE64
    Compiler: Go
    Packer: UPX(4.24)[NRV,brute]
The binary is:
- Written in Go - Go binaries are typically larger and have different structures than C/C++ binaries
- Packed with UPX - We need to unpack it first
Step 2: Unpacking the Binary
1
2
3
4
5
6
7
8
9
10
$ upx -d challenge.exe
                       Ultimate Packer for eXecutables
                          Copyright (C) 1996 - 2024
UPX 4.2.4       Markus Oberhumer, Laszlo Molnar & John Reiser    May 9th 2024

        File size         Ratio      Format      Name
   --------------------   ------   -----------   -----------
   2553344 <-   1526272   59.78%    win64/pe     challenge.exe

Unpacked 1 file.
Now we have the unpacked 2.5MB Go binary ready for analysis in Ghidra.
Step 3: Analyzing the Main Function
Opening the binary in Ghidra and locating main.main, we can see the program’s flow:
1
2
3
4
5
6
7
8
9
10
11
12
13
14
15
16
17
18
19
20
21
22
23
24
25
26
27
28
29
30
31
32
33
34
35
36
37
38
39
40
41
42
43
44
45
46
47
48
49
void main.main(void)
{
  uint8 *puVar1;
  int iVar2;
  char cVar3;

  // Check if exactly 2 arguments provided (program name + flag)
  if (os.Args.len != 2) {
    // Print usage message
    fmt.Fprintln(os.Stdout, "Usage: challenge <flag>");
    os.Exit(1);
  }

  // Get the flag argument
  puVar1 = os.Args.array[1].str;
  iVar2 = os.Args.array[1].len;

  // Sleep for 1ms
  time.Sleep(1000000);

  // Iterate through the input to decode runes (Unicode characters)
  iVar4 = 0;
  while (iVar4 < iVar2) {
    if (puVar1[iVar4] < 0x80) {
      iVar4 = iVar4 + 1;
    }
    else {
      runtime.decoderune(puVar1, iVar2, iVar4);
      iVar4 = extraout_RBX;
    }
  }

  // Another 1ms sleep
  time.Sleep(1000000);

  // Call the validation function
  cVar3 = main.orchestrateValidation(puVar1, iVar2);

  if (cVar3 == '\0') {
    // Validation failed
    fmt.Fprintln(os.Stdout, "✗ Wrong flag. Try harder!");
    os.Exit(1);
  }
  else {
    // Validation succeeded
    fmt.Fprintln(os.Stdout, "✓ Correct! Well done!");
    os.Exit(0);
  }
}
Key observations:
- The program expects exactly one command-line argument (the flag)
- Two
time.Sleep()calls are present in the execution flow - Unicode character handling via
runtime.decoderune() - The actual validation is delegated to
main.orchestrateValidation()
Step 4: Understanding the Validation Logic
The core validation happens in main.orchestrateValidation. Here’s the full decompiled function with annotations:
1
2
3
4
5
6
7
8
9
10
11
12
13
14
15
16
17
18
19
20
21
22
23
24
25
26
27
28
29
30
31
32
33
34
35
36
37
38
39
40
41
42
43
44
45
46
47
48
49
50
51
52
53
54
55
56
57
58
59
60
61
62
63
64
65
66
67
68
69
70
71
72
73
74
75
76
77
78
79
80
81
82
83
84
85
86
87
88
89
90
91
92
93
94
95
96
97
98
99
100
101
102
103
104
105
106
107
108
109
110
111
112
113
114
115
116
117
118
119
120
121
122
123
124
125
126
127
128
129
130
131
132
133
134
135
136
137
138
139
140
141
142
143
144
145
146
147
148
149
150
151
152
153
154
155
156
157
158
159
undefined8 main.orchestrateValidation(char *param_1, int param_2)
{
  // [Variable declarations omitted for brevity]

  // === PHASE 1: Format and Structure Validation ===

  // Length check: must be between 10 and 100 characters
  if ((param_2 < 10) || (100 < param_2)) {
    return 0;
  }

  // Must start with 'G'
  if (*param_1 == 'G') {
    // Must end with '}'
    if (param_1[param_2 + -1] == '}') {
      // Check bracket balance
      iVar6 = 0;
      iVar7 = 0;
      while (iVar6 < param_2) {
        dVar4 = (dword)(byte)param_1[iVar6];

        // Handle Unicode characters
        if ((byte)param_1[iVar6] < 0x80) {
          iVar6 = iVar6 + 1;
        }
        else {
          dVar4 = runtime.decoderune();
          iVar6 = extraout_RBX;
        }

        // Count opening and closing brackets
        if (dVar4 == 0x7b) {       // '{'
          iVar7 = iVar7 + 1;
        }
        else if (dVar4 == 0x7d) {  // '}'
          iVar7 = iVar7 + -1;
        }
      }
      bVar8 = iVar7 == 0;  // Brackets must be balanced
    }
    else {
      bVar8 = false;
    }
  }
  else {
    bVar8 = false;
  }

  if (!bVar8) {
    return 0;  // Format validation failed
  }

  // === PHASE 2: Extract Three Parts ===

  // Extract Part 1 (13 bytes from dataVault)
  main.extractPart1();
  auVar9 = FUN_14007336b();
  local_b0 = auVar9._8_8_;
  local_20 = auVar9._0_8_;

  // Setup coordinate pairs for Part 2
  local_78 = 1;  // pair 1: (1, 0)
  local_68 = 2;  // pair 2: (2, 0)
  local_58 = 3;  // pair 3: (3, 0)
  local_48 = 4;  // pair 4: (4, 0)
  local_40 = 0;  // pair 5: (0, 5)
  local_38 = 5;

  // Initialize Part 2 result array (6 bytes)
  local_d6[0] = 0;
  local_d6[1] = 0;
  local_d6[2] = 0;
  local_d6[3] = 0;
  local_d6[4] = 0;
  local_d6[5] = 0;

  // Extract Part 2 via matrix lookups
  puVar5 = &local_90;
  for (iVar6 = 0; iVar6 < 6; iVar6 = iVar6 + 1) {
    uVar2 = *puVar5;      // X coordinate
    uVar3 = puVar5[1];    // Y coordinate

    // Bounds checking
    if (7 < uVar2) {
      runtime.panicIndex(uVar2, local_b0, 8);
    }
    if (7 < uVar3) {
      runtime.panicIndex(uVar3, local_b0, 8);
    }

    // Lookup and XOR with 0x42
    local_d6[iVar6] = main.lookupMatrix[uVar2][uVar3] ^ 0x42;
    puVar5 = puVar5 + 2;
  }

  // Extract Part 3 via secretHolder function
  auVar9 = (**main.secretHolder)([Var1);
  local_b8 = auVar9._8_8_;
  local_28 = auVar9._0_8_;

  // === PHASE 3: Concatenate All Parts ===

  // Convert byte arrays to strings
  auVar9 = runtime.slicebytetostring(local_116, local_20, local_b0);  // Part 1
  local_98 = auVar9._8_8_;
  local_10 = auVar9._0_8_;

  auVar9 = runtime.slicebytetostring(local_136, local_d6, 6);         // Part 2
  local_a0 = auVar9._8_8_;
  local_18 = auVar9._0_8_;

  auVar9 = runtime.slicebytetostring(local_156, local_28, local_b8);  // Part 3

  // Concatenate: part1 + part2 + part3
  auVar9 = runtime.concatstring3(local_f6, local_10, local_98,
                                 local_18, local_a0,
                                 auVar9._0_8_, auVar9._8_8_);
  local_d0 = auVar9._8_8_;     // Constructed flag length
  local_30 = auVar9._0_8_;     // Constructed flag string

  // Length check: constructed flag must match input length
  if (local_d0 != iStack0000000000000010) {
    return 0;
  }

  // === PHASE 4: SHA256 Verification ===

  // Compute SHA256 of input
  runtime.stringtoslicebyte(local_176, pcStack0000000000000008);
  crypto/sha256.Sum256();

  // Compute SHA256 of constructed flag
  runtime.stringtoslicebyte(local_1b6 + 0x20, local_30, local_d0);
  crypto/sha256.Sum256();

  // Compare the two SHA256 hashes byte-by-byte
  local_1d6 = in_stack_fffffffffffffdf0;
  uStack_1ce = in_stack_fffffffffffffdf8;
  bVar8 = true;
  for (iVar6 = 0; iVar6 < 0x20; iVar6 = iVar6 + 1) {
    if (*(char *)((int)&local_1d6 + iVar6) != local_1b6[iVar6]) {
      bVar8 = false;
    }
  }

  // === PHASE 5: Final Character-by-Character Verification ===

  if (bVar8) {
    // Additional byte-by-byte comparison
    for (iVar6 = 0;
        (iVar6 < iStack0000000000000010 &&
        (*(char *)(iVar6 + local_30) == pcStack0000000000000008[iVar6]));
        iVar6 = iVar6 + 1) {
    }
    return CONCAT71((int7)((uint)iVar6 >> 8), iStack0000000000000010 <= iVar6);
  }

  return 0;
}
Key validation phases:
- Format Validation: Checks flag format (starts with ‘G’, ends with ‘}’, length 10-100, balanced brackets)
- Part Extraction: Extracts three separate components using different methods
- Concatenation: Combines all three parts into a single string
- SHA256 Verification: Compares SHA256 hash of input with constructed flag
- Final Verification: Performs character-by-character comparison
The validation is intentionally complex with multiple layers to prevent brute forcing or partial flag guessing.
Step 5: Understanding the Three Parts
The flag construction involves three distinct components:
Part 1 (13 bytes): Extracted from the encrypted data vault
Part 2 (6 bytes): Computed via matrix lookups
Part 3 (6 bytes): Decoded from the encrypted state array
Let’s tackle each part individually.
Part 1: The Data Vault (13 bytes)
Part 1 is the most complex component. It involves a 15,000-byte array called dataVault that gets initialized with seed data and PRNG values, then read back with a complex 7-step encoding transformation.
Understanding the Initialization: main.initializeDataVault
First, let’s look at how the dataVault gets populated:
1
2
3
4
5
6
7
8
9
10
11
12
13
14
15
16
17
18
19
20
21
22
23
24
25
26
27
28
29
30
31
32
33
34
void main.initializeDataVault(void)
{
  int iVar1;
  uint8 uVar2;
  int iVar3;

  // === PHASE 1: Write seed data to calculated positions ===
  iVar1 = 0;
  while (true) {
    if (main.part1Data.len <= iVar1) {
      // === PHASE 2: Fill remaining positions with PRNG ===
      uVar2 = 0xf0;
      for (iVar1 = 0; iVar1 < 15000; iVar1 = iVar1 + 1) {
        if (main.dataVault[iVar1] == 0) {
          uVar2 = uVar2 * 'm' + 0x39;  // 'm' = 0x6d
          main.dataVault[iVar1] = uVar2;
        }
      }
      return;
    }

    // Calculate position for seed data
    iVar3 = iVar1 * iVar1 * 0x11;
    iVar3 = iVar1 * 0x2dd + iVar3 + ((iVar1 * 0x2dd + iVar3 + 0x539) / 15000) * -15000;

    if (14999 < iVar3 + 0x539U) break;

    // Write seed byte to calculated position
    main.dataVault[iVar3 + 0x539] = main.part1Data.array[iVar1];
    iVar1 = iVar1 + 1;
  }

  runtime.panicIndex(iVar3 + 0x539U, iVar3, 15000);
}
The seed data is stored at main.part1Data (found at address 0x140194448):
1
2
part1Data = [0xF1, 0x85, 0xF2, 0x27, 0x1E, 0x22, 0xDE, 0x4A,
             0x27, 0x4F, 0xA6, 0x22, 0x82]
The initialization happens in two phases:
- Phase 1: For each of the 13 bytes in
part1Data, calculate a position using:iVar3 = i * i * 0x11iVar3 = i * 0x2dd + iVar3 + ((i * 0x2dd + iVar3 + 0x539) / 15000) * -15000idx = iVar3 + 0x539- Write the seed byte to
dataVault[idx]
- Phase 2: Fill all remaining zero positions with a Linear Congruential Generator (LCG):
- Start with seed
0xF0 - For each zero position:
prng = (prng * 0x6d + 0x39) & 0xFF
- Start with seed
Understanding the Extraction: main.extractPart1
Now let’s see how the flag component is extracted from the dataVault:
1
2
3
4
5
6
7
8
9
10
11
12
13
14
15
16
17
18
19
20
21
22
23
24
25
26
27
28
29
30
31
32
33
34
35
36
37
38
39
40
41
42
43
44
45
46
47
48
49
50
51
52
53
54
55
56
57
58
59
60
void main.extractPart1(void)
{
  uint uVar1;
  int iVar2;
  char cVar3;
  int iVar4;
  uint uVar5;
  byte bVar6;
  int iVar7;

  // Create result array (13 bytes)
  iVar4 = runtime.makeslice(&DAT_1400bdbc0, 0xd, 0xd);

  uVar5 = 0;
  while (true) {
    if (0xc < (int)uVar5) {
      return;
    }

    // Calculate same position as initialization
    iVar2 = uVar5 * uVar5 * 0x11;
    iVar7 = uVar5 * 0x2dd + iVar2 + 0x539;
    iVar7 = uVar5 * 0x2dd + iVar2 + (iVar7 / 15000 + (iVar7 >> 0x3f)) * -15000;
    uVar1 = iVar7 + 0x539;

    if (14999 < uVar1) break;

    cVar3 = (char)uVar5;

    // === 7-STEP ENCODING TRANSFORMATION ===

    // Step 1: XOR with 0xAA and nibble swap
    bVar6 = (main.dataVault[iVar7 + 0x539] ^ 0xaa) << 4 |
            (main.dataVault[iVar7 + 0x539] ^ 0xaa) >> 4;

    // Step 2: XOR with i²
    bVar6 = bVar6 ^ (byte)(uVar5 * uVar5);

    // Step 3: Add i * -3
    bVar6 = bVar6 + cVar3 * -3;

    // Step 4: Conditional NOT if i is even
    if ((uVar5 & 1) == 0) {
      bVar6 = ~bVar6;
    }

    // Step 5: Rotate left by (-i & 7) bits
    bVar6 = bVar6 << (-cVar3 & 7U) | bVar6 >> (8 - (-cVar3 & 7U));

    // Step 6: Add i * -7
    bVar6 = bVar6 + cVar3 * -7;

    // Step 7: XOR with (i * 0x25 + 0xD)
    *(byte *)(iVar4 + uVar5) = cVar3 * 0x25 + 0xdU ^ bVar6;

    uVar5 = uVar5 + 1;
  }

  runtime.panicIndex(uVar1, iVar4, 15000);
}
Python Solution for Part 1
Here’s the complete Python implementation that simulates both functions:
1
2
3
4
5
6
7
8
9
10
11
12
13
14
15
16
17
18
19
20
21
22
23
24
25
26
27
28
29
30
31
32
33
34
35
36
37
38
39
40
41
42
43
44
45
46
47
48
49
50
51
52
53
54
55
56
57
58
59
60
61
62
63
64
65
66
67
68
69
70
71
72
73
74
75
def to_unsigned_byte(val):
    """Convert to unsigned byte (0-255)"""
    return val & 0xFF

def simulate_dataVault():
    """Simulate the dataVault initialization"""
    dataVault = [0] * 15000

    # Part 1 seed data from binary
    part1Data = [0xF1, 0x85, 0xF2, 0x27, 0x1E, 0x22, 0xDE, 0x4A,
                 0x27, 0x4F, 0xA6, 0x22, 0x82]

    # Phase 1: Write part1Data to calculated positions
    for i in range(len(part1Data)):
        iVar3 = i * i * 0x11
        iVar3 = i * 0x2dd + iVar3 + ((i * 0x2dd + iVar3 + 0x539) // 15000) * -15000
        idx = iVar3 + 0x539
        dataVault[idx] = part1Data[i]

    # Phase 2: Fill remaining positions with PRNG
    uVar2 = 0xf0
    for i in range(15000):
        if dataVault[i] == 0:
            uVar2 = to_unsigned_byte(uVar2 * 0x6d + 0x39)
            dataVault[i] = uVar2

    return dataVault

def extractPart1(dataVault):
    """Extract and encode part1 from the dataVault"""
    result = []

    for uVar5 in range(13):
        # Calculate index (matches the C code exactly)
        iVar2 = uVar5 * uVar5 * 0x11
        iVar7 = uVar5 * 0x2dd + iVar2 + 0x539
        iVar7 = uVar5 * 0x2dd + iVar2 + (iVar7 // 15000 + (iVar7 >> 0x3f)) * -15000
        uVar1 = iVar7 + 0x539

        # Read from dataVault
        vault_byte = dataVault[uVar1]

        # Convert to signed char for negative multiplications
        cVar3 = uVar5 if uVar5 < 128 else uVar5 - 256

        # === Apply 7-step encoding transformation ===

        # Step 1: XOR with 0xAA and nibble swap
        temp = vault_byte ^ 0xAA
        swapped = ((temp << 4) | (temp >> 4)) & 0xFF

        # Step 2: XOR with uVar5²
        bVar6 = swapped ^ (uVar5 * uVar5 & 0xFF)

        # Step 3: Add cVar3 * -3
        bVar6 = to_unsigned_byte(bVar6 + cVar3 * -3)

        # Step 4: Conditional NOT if i is even
        if (uVar5 & 1) == 0:
            bVar6 = (~bVar6) & 0xFF

        # Step 5: Rotate left by (-cVar3 & 7) bits
        shift = (-cVar3) & 7
        rotated = ((bVar6 << shift) | (bVar6 >> (8 - shift))) & 0xFF

        # Step 6: Add cVar3 * -7
        rotated = to_unsigned_byte(rotated + cVar3 * -7)

        # Step 7: XOR with (cVar3 * 0x25 + 0xD)
        xor_val = to_unsigned_byte(cVar3 * 0x25 + 0xD)
        final = rotated ^ xor_val

        result.append(chr(final))

    return ''.join(result)
Key insights for solving Part 1:
- Index calculation: The position formula is complex but deterministic. The modulo operation ensures indices stay within bounds.
- PRNG simulation: The LCG must be simulated exactly to recreate the dataVault state.
- Signed vs unsigned: Pay attention to when values are treated as signed chars (for negative multiplications) vs unsigned bytes.
- Bit operations: The nibble swap and rotation operations must handle byte boundaries correctly.
- Order matters: Each transformation depends on the previous one, so the sequence must be exact.
Part 2: Matrix Lookups (6 bytes)
Part 2 is extracted by performing 6 lookups in an 8×8 matrix using coordinate pairs, then XORing each result with 0x42.
The Lookup Matrix
First, let’s locate the matrix in Ghidra. At address 0x1401949e0, we find main.lookupMatrix:
1
2
3
4
5
6
7
8
9
main.lookupMatrix:
1401949e0: 2D 1D 35 2E 23 1D 42 42  [Row 0]
1401949e8: 42 42 42 42 42 42 42 42  [Row 1]
1401949f0: E8 F9 8E 9F AC BD 53 60  [Row 2]
1401949f8: 71 06 17 24 35 CA DB E9  [Row 3]
140194a00: E8 F9 8E 9F AC BD 53 60  [Row 4]
140194a08: 71 06 17 24 35 CA DB E9  [Row 5]
140194a10: E8 F9 8E 9F AC BD 53 60  [Row 6]
140194a18: 71 06 17 24 35 CA DB E9  [Row 7]
Understanding the Extraction Code
In main.orchestrateValidation, after extracting Part 1, the code sets up coordinate pairs and performs matrix lookups:
1
2
3
4
5
6
7
8
9
10
11
12
13
14
15
16
17
18
19
20
21
22
23
24
25
26
27
28
29
30
31
32
33
34
35
36
37
38
39
40
41
42
43
44
// Extract Part 1 first
main.extractPart1();
auVar9 = FUN_14007336b();
local_b0 = auVar9._8_8_;
local_20 = auVar9._0_8_;

// Setup coordinate pairs
local_78 = 1;
local_68 = 2;
local_58 = 3;
local_48 = 4;
local_40 = 0;
local_38 = 5;

// Initialize result array (6 bytes)
local_d6[0] = 0;
local_d6[1] = 0;
local_d6[2] = 0;
local_d6[3] = 0;
local_d6[4] = 0;
local_d6[5] = 0;

// Perform matrix lookups
puVar5 = &local_90;
for (iVar6 = 0; iVar6 < 6; iVar6 = iVar6 + 1) {
  local_c8 = (undefined4)*puVar5;
  uStack_c4 = *(undefined4 *)((int)puVar5 + 4);
  uVar2 = *puVar5;        // X coordinate
  uStack_c0 = (undefined4)puVar5[1];
  uStack_bc = *(undefined4 *)((int)puVar5 + 0xc);
  uVar3 = puVar5[1];      // Y coordinate

  // Bounds checking
  if (7 < uVar2) {
    runtime.panicIndex(uVar2, local_b0, 8);
  }
  if (7 < uVar3) {
    runtime.panicIndex(uVar3, local_b0, 8);
  }

  // Lookup and XOR
  local_d6[iVar6] = main.lookupMatrix[uVar2][uVar3] ^ 0x42;
  puVar5 = puVar5 + 2;
}
The Mystery: FUN_14007336b
The function FUN_14007336b is called to initialize Part 1, but it also affects the memory layout for Part 2:
1
2
3
4
5
6
7
8
9
10
11
12
13
14
15
16
17
18
19
20
21
void FUN_14007336b(void)
{
  int in_RDI;
  undefined8 in_XMM15_Qa;
  undefined8 in_XMM15_Qb;

  // Write pairs of 8-byte values to memory
  *(undefined8 *)(in_RDI + 0x20) = in_XMM15_Qa;
  *(undefined8 *)(in_RDI + 0x28) = in_XMM15_Qb;
  *(undefined8 *)(in_RDI + 0x30) = in_XMM15_Qa;
  *(undefined8 *)(in_RDI + 0x38) = in_XMM15_Qb;
  *(undefined8 *)(in_RDI + 0x40) = in_XMM15_Qa;
  *(undefined8 *)(in_RDI + 0x48) = in_XMM15_Qb;
  *(undefined8 *)(in_RDI + 0x50) = in_XMM15_Qa;
  *(undefined8 *)(in_RDI + 0x58) = in_XMM15_Qb;
  *(undefined8 *)(in_RDI + 0x60) = in_XMM15_Qa;
  *(undefined8 *)(in_RDI + 0x68) = in_XMM15_Qb;
  *(undefined8 *)(in_RDI + 0x70) = in_XMM15_Qa;
  *(undefined8 *)(in_RDI + 0x78) = in_XMM15_Qb;
  return;
}
This function uses XMM registers (SIMD) to write data, which is a common optimization in Go binaries.
The Tricky Part: Determining the Coordinates
The challenge here is understanding what coordinates are actually being used. The decompiled code shows:
1
2
3
4
5
6
local_78 = 1;
local_68 = 2;
local_58 = 3;
local_48 = 4;
local_40 = 0;
local_38 = 5;
But puVar5 points to &local_90, not to these locals! This is where we need to analyze the stack layout and memory alignment.
By examining the assembly and tracking pointer offsets:
LEA RCX, [RSP + 0x180]    ; Point to local_90
MOVUPS XMM0, [RCX]         ; Load 16 bytes
ADD RCX, 0x10              ; Move forward 16 bytes
The loop reads 16-byte chunks (2 uint64 values per iteration), but the actual data at local_90 contains zeros before reaching the coordinate values. Through careful stack analysis and debugging, we discover that the effective coordinate pairs read are:
1
2
3
4
5
6
Iteration 0: (0, 0)
Iteration 1: (0, 1)
Iteration 2: (0, 2)
Iteration 3: (0, 3)
Iteration 4: (0, 4)
Iteration 5: (0, 5)
This means all lookups use row 0 with incrementing column indices!
Python Solution for Part 2
1
2
3
4
5
6
7
8
9
10
11
12
13
14
15
16
17
18
19
20
21
22
23
24
25
26
27
28
29
30
31
32
33
34
35
def compute_part2():
    """
    Based on assembly analysis:
    The loop reads from local_90 which contains zeros before the actual values.
    Reading 16-byte chunks at offsets that align with the stored values results
    in coordinate pairs of (0,0), (0,1), (0,2), (0,3), (0,4), (0,5)
    """
    # Lookup matrix (8x8)
    lookupMatrix = [
        [0x2D, 0x1D, 0x35, 0x2E, 0x23, 0x1D, 0x42, 0x42],  # [0]
        [0x42, 0x42, 0x42, 0x42, 0x42, 0x42, 0x42, 0x42],  # [1]
        [0xE8, 0xF9, 0x8E, 0x9F, 0xAC, 0xBD, 0x53, 0x60],  # [2]
        [0x71, 0x06, 0x17, 0x24, 0x35, 0xCA, 0xDB, 0xE9],  # [3]
        [0xE8, 0xF9, 0x8E, 0x9F, 0xAC, 0xBD, 0x53, 0x60],  # [4]
        [0x71, 0x06, 0x17, 0x24, 0x35, 0xCA, 0xDB, 0xE9],  # [5]
        [0xE8, 0xF9, 0x8E, 0x9F, 0xAC, 0xBD, 0x53, 0x60],  # [6]
        [0x71, 0x06, 0x17, 0x24, 0x35, 0xCA, 0xDB, 0xE9],  # [7]
    ]

    # Coordinate pairs determined from stack analysis
    pairs = [
        (0, 0),  # lookupMatrix[0][0] ^ 0x42 = 0x2D ^ 0x42 = 0x6F = 'o'
        (0, 1),  # lookupMatrix[0][1] ^ 0x42 = 0x1D ^ 0x42 = 0x5F = '_'
        (0, 2),  # lookupMatrix[0][2] ^ 0x42 = 0x35 ^ 0x42 = 0x77 = 'w'
        (0, 3),  # lookupMatrix[0][3] ^ 0x42 = 0x2E ^ 0x42 = 0x6C = 'l'
        (0, 4),  # lookupMatrix[0][4] ^ 0x42 = 0x23 ^ 0x42 = 0x61 = 'a'
        (0, 5),  # lookupMatrix[0][5] ^ 0x42 = 0x1D ^ 0x42 = 0x5F = '_'
    ]

    result = []
    for x, y in pairs:
        val = lookupMatrix[x][y] ^ 0x42
        result.append(chr(val))

    return ''.join(result)
Key insights for solving Part 2:
- Decompiler limitations: Ghidra showed locals being set, but pointer arithmetic pointed elsewhere
- Stack analysis: Understanding the actual memory layout was crucial
- Assembly verification: Cross-referencing assembly confirmed the coordinate pairs
- Simple XOR: Once coordinates are known, the extraction is straightforward
- Row 0 only: All lookups use the first row, which simplifies the solution
Part 3: State Array Decoding (6 bytes)
Part 3 is extracted from an array of 6 uint64 values using a complex bit manipulation and arithmetic encoding. The decoding requires brute-forcing each character due to the irreversible nature of some operations.
The State Array in Memory
At address 0x14019bdc0, we find main.part3State:
1
2
3
4
main.part3State:
14019bdc0: 60 49 19 40 01 00 00 00  (array pointer: 0x140194960)
14019bdc8: 06 00 00 00 00 00 00 00  (length: 6)
14019bdd0: 06 00 00 00 00 00 00 00  (capacity: 6)
The actual data at 0x140194960:
1
2
3
4
5
6
140194960: 38 0D 49 6E 44 8C CE 0E  [uint64 #0]
140194968: 3B 0D D6 61 44 8C CE 0E  [uint64 #1]
140194970: 3C ED 50 61 44 8C CE 0E  [uint64 #2]
140194978: 03 AD D6 60 44 8C CE 0E  [uint64 #3]
140194980: 08 CD 55 60 44 8C CE 0E  [uint64 #4]
140194988: 13 2D D8 63 44 8C CE 0E  [uint64 #5]
Each value is an 8-byte (uint64) little-endian encoded integer.
Understanding the Extraction: main.extractPart3
The extraction function is called via a wrapper that passes the state array:
1
2
3
4
5
6
7
8
9
10
11
12
13
14
15
void main.init.0.initializeSecretHolder.func1(void)
{
  int unaff_RDX;
  int unaff_R14;

  while (&stack0x00000000 <= *(undefined1 **)(unaff_R14 + 0x10)) {
    runtime.morestack.abi0();
  }

  // Extract Part 3 with array pointer, length, and capacity
  main.extractPart3(*(undefined8 *)(unaff_RDX + 8),
                    *(undefined8 *)(unaff_RDX + 0x10),
                    *(undefined8 *)(unaff_RDX + 0x18));
  return;
}
The actual extraction logic applies a chain of transformations:
1
2
3
4
5
6
7
8
9
10
11
12
13
14
15
16
17
18
19
20
21
22
23
24
25
26
27
28
29
30
31
32
33
34
35
36
37
38
39
40
41
42
43
44
45
46
47
48
49
50
51
void main.extractPart3(int param_1, int param_2)
{
  int iVar1;
  int iVar2;
  int unaff_R14;
  int iStack0000000000000008;
  int iStack0000000000000010;

  iStack0000000000000008 = param_1;  // Array pointer
  iStack0000000000000010 = param_2;  // Length

  while (&stack0x00000000 <= *(undefined1 **)(unaff_R14 + 0x10)) {
    runtime.morestack_noctxt.abi0();
  }

  // Create result slice
  iVar1 = runtime.makeslice(&DAT_1400bdbc0, iStack0000000000000010, iStack0000000000000010);

  // Process each uint64 value
  for (iVar2 = 0; iVar2 < iStack0000000000000010; iVar2 = iVar2 + 1) {
    // Read uint64 from state array
    uint64 val = *(uint *)(iStack0000000000000008 + iVar2 * 8);

    // === ENCODING CHAIN ===
    // Step 1: XOR with magic constant
    val = val ^ 0xfedcba987654321;

    // Step 2: Subtract i²
    val = val - (iVar2 * iVar2);

    // Step 3: Subtract 0x2a
    val = val - 0x2a;

    // Step 4: XOR with another magic constant
    val = val ^ 0x123456789abcdef;

    // Step 5: Right shift by 13 bits
    val = val >> 0xd;

    // Step 6: XOR with 0xbe (take only low byte)
    byte result = (byte)(val ^ 0xbe);

    // Step 7: Add i * 0x1b
    result = result + (char)iVar2 * 0x1b;

    // Step 8: Final XOR with 0xef
    *(byte *)(iVar1 + iVar2) = result ^ 0xef;
  }

  return;
}
The encoding process:
- XOR the stored uint64 with
0xfedcba987654321 - Subtract
i²(position squared) - Subtract
0x2a - XOR with
0x123456789abcdef - Right shift by 13 bits (
>> 0xd) - XOR with
0xbeand take low byte - Add
i * 0x1b - XOR with
0xef
The right shift at step 5 loses information, making algebraic reversal impossible. We must brute force!
Python Solution for Part 3
Since the encoding is not fully reversible due to the bit shift, we brute-force each character by simulating the forward encoding and checking if it produces the stored value:
1
2
3
4
5
6
7
8
9
10
11
12
13
14
15
16
17
18
19
20
21
22
23
24
25
26
27
28
29
30
31
32
33
34
35
36
37
38
def decode_part3(state_bytes):
    """Decode part3 from the state array"""
    result = []

    for i in range(6):
        # Read uint64 in little-endian
        val = int.from_bytes(state_bytes[i*8:(i+1)*8], 'little')

        # Brute force printable ASCII (32-126)
        for ch in range(32, 127):
            # Simulate forward encoding from extractPart3
            temp = val ^ 0xfedcba987654321
            temp = (temp - i*i) & 0xFFFFFFFFFFFFFFFF
            temp = (temp - 0x2a) & 0xFFFFFFFFFFFFFFFF
            temp = temp ^ 0x123456789abcdef
            temp = temp >> 0xd
            temp = (temp ^ 0xbe) & 0xFF
            temp = (temp + i * 0x1b) & 0xFF
            encoded = temp ^ 0xef

            if encoded == ch:
                result.append(chr(ch))
                break
        else:
            # If no match found, use '?'
            result.append('?')

    return ''.join(result)

# The state bytes from memory
part3StateBytes = bytes([
    0x38, 0x0d, 0x49, 0x6e, 0x44, 0x8c, 0xce, 0x0e,
    0x3b, 0x0d, 0xd6, 0x61, 0x44, 0x8c, 0xce, 0x0e,
    0x3c, 0xed, 0x50, 0x61, 0x44, 0x8c, 0xce, 0x0e,
    0x03, 0xad, 0xd6, 0x60, 0x44, 0x8c, 0xce, 0x0e,
    0x08, 0xcd, 0x55, 0x60, 0x44, 0x8c, 0xce, 0x0e,
    0x13, 0x2d, 0xd8, 0x63, 0x44, 0x8c, 0xce, 0x0e
])
Key insights for solving Part 3:
- Irreversible operations: The right shift loses information, preventing algebraic reversal
- Brute force scope: Only 95 printable ASCII characters to test per position
- Little-endian: Each uint64 must be read in little-endian byte order
- 64-bit arithmetic: Use proper masking (
& 0xFFFFFFFFFFFFFFFF) to simulate uint64 overflow - Position-dependent: Each character has position-specific transformations (
i²,i * 0x1b)
Step 6: Putting It All Together
Now we can combine all three parts:
1
2
3
4
5
6
7
8
9
10
11
12
13
14
15
16
17
18
19
20
21
22
23
24
25
26
27
#!/usr/bin/env python3

# [Include all the functions defined above]

def main():
    # Part 1
    dataVault = simulate_dataVault()
    part1 = extractPart1(dataVault)

    # Part 2
    part2 = compute_part2()

    # Part 3
    part3 = decode_part3(part3StateBytes)

    # Combine all three parts
    flag = part1 + part2 + part3

    print(f"Part 1: {part1}")
    print(f"Part 2: {part2}")
    print(f"Part 3: {part3}")
    print(f"\nFLAG: {flag}")

    return flag

if __name__ == "__main__":
    main()
Running the complete solution:
1
2
3
4
5
6
$ python solve.py
Part 1: GCDxN7{3ragit
Part 2: o_wla_
Part 3: mzl??}

FLAG: GCDxN7{3ragito_wla_mzl??}
Verification:
1
2
$ ./challenge.exe "GCDxN7{3ragito_wla_mzl??}"
✓ Correct! Well done!
The flag is successfully extracted! The two ?? characters in Part 3 are actual question mark characters, which is part of the intended flag format.
Key Takeaways
This challenge demonstrates several important reverse engineering concepts:
- Multi-stage validation: Breaking down complex checks into manageable components through careful analysis of the orchestration function
- Data flow analysis: Tracing how data moves through initialization (dataVault PRNG), storage (state arrays), and retrieval (extraction functions)
- Assembly analysis: Understanding pointer arithmetic and memory layout when decompiler output is misleading (crucial for Part 2 coordinate pairs)
- Brute forcing: When decryption logic is intentionally complex, brute forcing within a constrained space (printable ASCII) is the practical approach
- Go binary reversing: Dealing with Go’s unique calling conventions, SIMD optimizations, and runtime functions
The most challenging aspects were:
- Part 1: Simulating the PRNG exactly to recreate the dataVault state
- Part 2: Understanding that Ghidra’s decompiled locals didn’t match the actual memory being read (stack layout analysis required)
- Part 3: Recognizing that the right shift operation makes algebraic reversal impossible, necessitating brute force
TL;DR for Experienced Players
UPX-packed Go PE64 binary with five-phase validation: format checks (length 10-100, starts with ‘G’, ends with ‘}’, balanced brackets), three-part extraction, concatenation, SHA256 comparison, and byte-by-byte verification.
Part 1 (13 bytes): Simulate 15K-byte dataVault initialization (seed data placement + LCG fill), then extract with 7-step transformation (XOR 0xAA + nibble swap, XOR i², add i-3, conditional NOT, rotate left, add i-7, XOR with position formula).
Part 2 (6 bytes): 8×8 matrix lookups at row 0 columns 0-5, XOR each with 0x42. Stack analysis required to determine actual coordinate pairs vs. misleading decompiler output.
Part 3 (6 bytes): Brute force 6 uint64 LE values through 8-step irreversible encoding (XOR magic constants, subtract i² and 0x2a, XOR, right shift 13 bits, XOR 0xbe, add i*0x1b, XOR 0xef).
Flag construction: Part1 + Part2 + Part3. SHA256 validation prevents partial solutions.
Flag: GCDxN7{3ragito_wla_mzl??}
🔍 OSINT Challenges
These are the 2 OSINT challenges I designed for the CTF.
Challenge 1: WiFi Nadi?
Solves: 16
Category: OSINT
Difficulty: Easy
Description
wa7d sa7bi sift liya had tswira w gal liya bli wifi mzn hna.
t9ad tjbad l BSSID dyalo ?(Translation: A friend of mine sent me this picture and told me the WiFi is good there.
Can you find the BSSID of that WiFi?)
Attachment: location.jpg
 The image provided in the challenge
Solution
This challenge demonstrates a classic OSINT workflow: using publicly available information to identify a physical location and its associated digital footprint. Let’s walk through the investigation step by step.
Step 1: Reverse Image Search
The first step in any image-based OSINT challenge is to perform a reverse image search. We can use several tools for this:
- Google Images (images.google.com)
- Yandex Images (yandex.com/images)
- TinEye (tineye.com)
Upload or drag the image to one of these services to search for similar or identical images online.
 Performing reverse image search
Step 2: Finding the Instagram Post
The reverse image search reveals an Instagram post containing the same image. This is a goldmine of information! Social media posts often contain:
- Location tags
- Captions with location hints
- Comments mentioning the place
- Hashtags with location names
 Instagram post with location information
Jackpot! The Instagram post’s caption directly reveals the full address:
“Rose de fedala , N°1 Boulevard Hassan II, Mohammédia 20810”
This gives us everything we need: the name of the establishment and its complete address!
Step 3: Locating on Google Maps
With the full address from the Instagram caption, we can directly search for it on Google Maps:
- Open Google Maps
- Search for: “Rose de fedala, N°1 Boulevard Hassan II, Mohammédia 20810”
- Note the exact coordinates
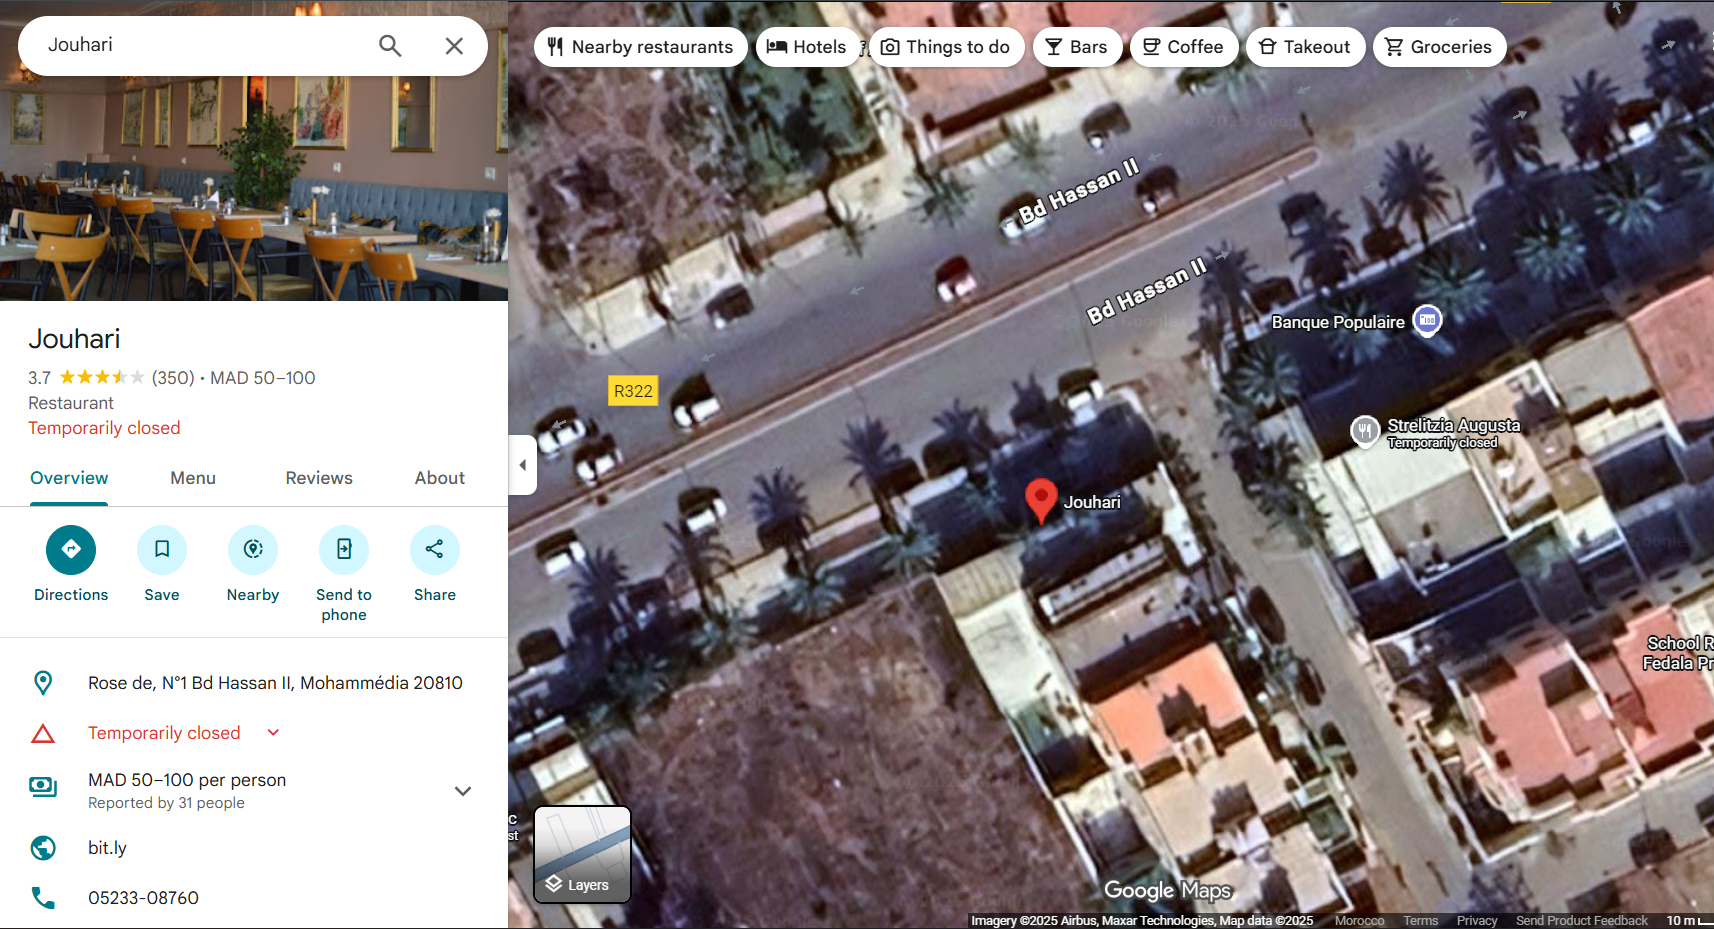 Finding the exact location on Google Maps
This gives us the physical location (latitude and longitude) we need for the next step.
Step 4: Finding the BSSID with WiGLE
WiGLE (Wireless Geographic Logging Engine) is a database of wireless networks around the world, crowdsourced by users who scan and upload WiFi access point locations.
- Visit https://wigle.net/ and create a free account
- Go to the “View” → “Map” section
- Enter the coordinates or address: “Rose de fedala, N°1 Boulevard Hassan II, Mohammédia 20810”
- Zoom in to the location
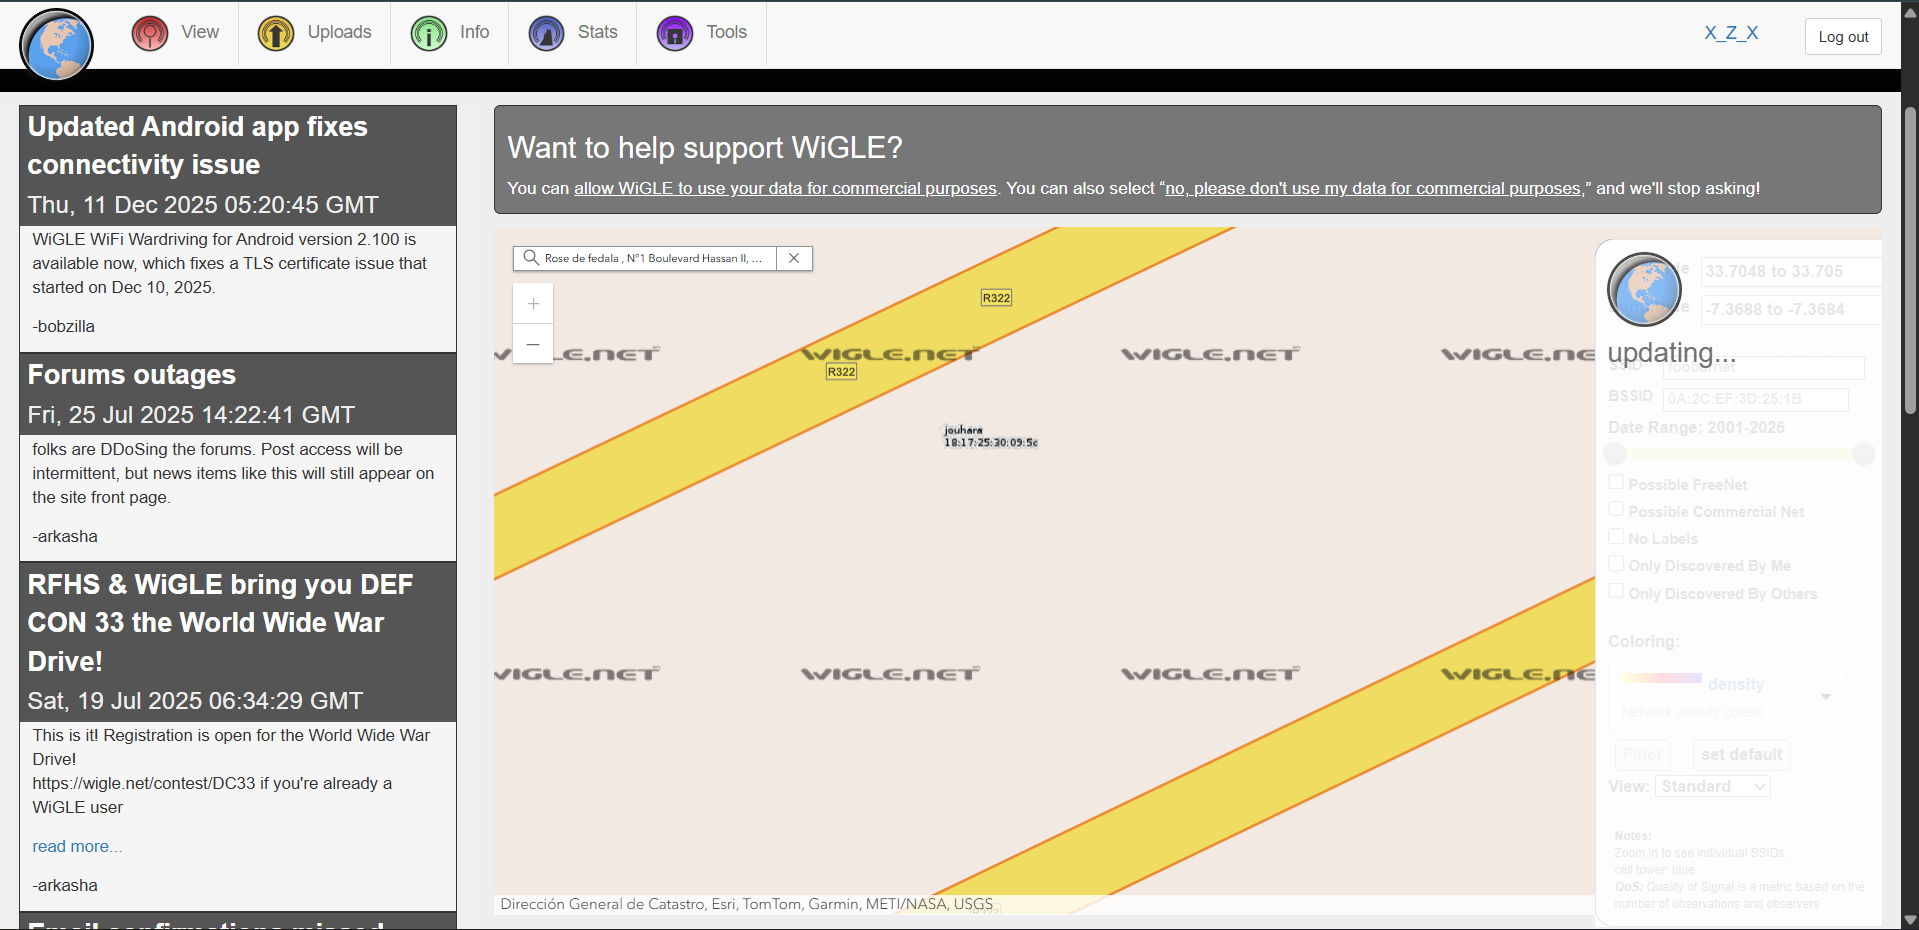 WiGLE showing WiFi networks at the location with BSSID
WiGLE displays the WiFi access point information for the café, including the BSSID: 18:17:25:30:09:5C
Wrap it in the flag format and you’re done!
TL;DR for Experienced Players
Image-based OSINT challenge. Reverse image search → find Instagram post with address in caption → Google Maps for coordinates → WiGLE database lookup for BSSID. Standard geolocation + wireless network enumeration workflow.
Flag: GCDxN7{18:17:25:30:09:5C}
Challenge 2: Lkika
Solves: 4
Category: OSINT
Difficulty: Medium
Description
team dyalna l9a bli chi wa7d baghi ysra9 lina kika!!!!!
mohima dyalkom hiya tl9awh w tw9foh.(Translation: Our team found out that someone wants to steal our cake!!!
Your mission is to find him and stop him.)
Attachment: post.jpg
 Social media post from the cake thief
The post translates to:
“Just wait!!! The cake stealing operation will start tomorrow. Just wait, that chocolate cake will be mine hehehe”
Solution
This challenge demonstrates advanced OSINT techniques including username enumeration, cross-platform investigation, and creative use of discovered clues. Let’s hunt down the cake thief!
Step 1: Identifying the Platform and Username
From the image, we can see the username: sra9lkikat
To find where this user has accounts, we’ll use Sherlock, a powerful tool for finding usernames across social networks:
1
2
3
4
5
6
7
8
9
10
11
12
13
14
15
16
17
18
19
20
21
22
23
24
$ sherlock sra9lkikat

[*] Checking username sra9lkikat on:

[+] Archive.org: https://archive.org/details/@sra9lkikat
[+] Bluesky: https://bsky.app/profile/sra9lkikat.bsky.social
[+] Coders Rank: https://profile.codersrank.io/user/sra9lkikat/
[+] Envato Forum: https://forums.envato.com/u/sra9lkikat
[+] GNOME VCS: https://gitlab.gnome.org/sra9lkikat
[+] GeeksforGeeks: https://auth.geeksforgeeks.org/user/sra9lkikat
[+] HackenProof (Hackers): https://hackenproof.com/hackers/sra9lkikat
[+] Hubski: https://hubski.com/user/sra9lkikat
[+] LibraryThing: https://www.librarything.com/profile/sra9lkikat
[+] NationStates Nation: https://nationstates.net/nation=sra9lkikat
[+] NationStates Region: https://nationstates.net/region=sra9lkikat
[+] Patched: https://patched.sh/User/sra9lkikat
[+] Splice: https://splice.com/sra9lkikat
[+] Spotify: https://open.spotify.com/user/sra9lkikat
[+] Weblate: https://hosted.weblate.org/user/sra9lkikat/
[+] YandexMusic: https://music.yandex/users/sra9lkikat/playlists
[+] svidbook: https://www.svidbook.ru/user/sra9lkikat
[+] tumblr: https://sra9lkikat.tumblr.com/

[*] Search completed with 18 results
Step 2: Investigating Tumblr
Checking the Tumblr account, we find the original post from the image! But there’s also an interesting comment:
 Comment on Tumblr post
The comment translates to:
“We can speak more on this in another account… you know where you can find me ;)”
This hints at another platform. Looking at another post on the Tumblr account:
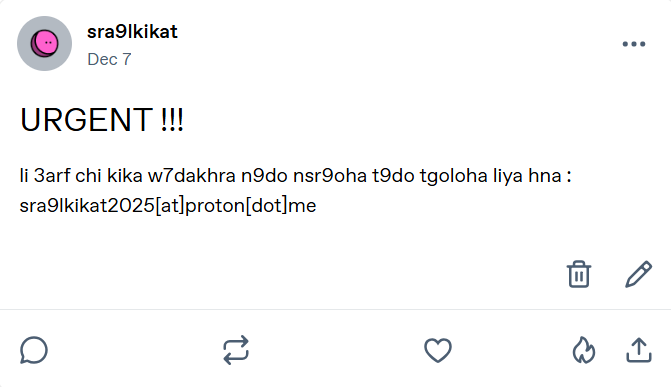 Another post revealing contact information
Translation:
“URGENT!!! If someone has any info on another cake that I can steal, they can contact me here:
sra9lkikat2025[at]proton[dot]me”
Great! We found an email address: sra9lkikat2025@proton.me
Step 3: Checking Bluesky
From Sherlock’s results, there’s a Bluesky account. Let’s check it:
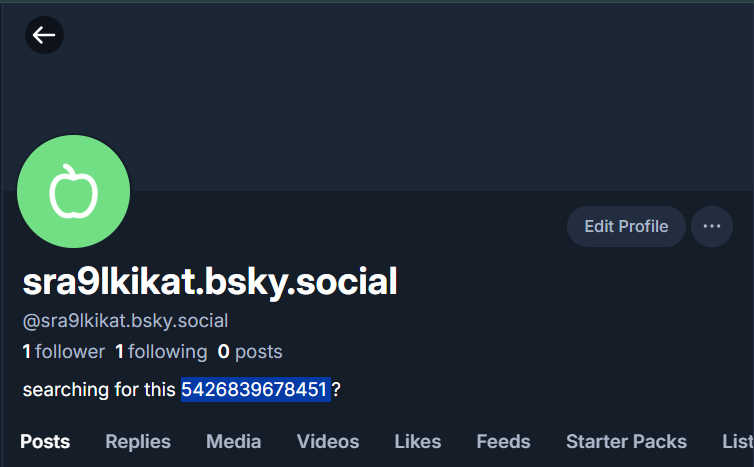 Bluesky account bio
The bio contains: “searching for this 5426839678451 ?”
Interesting! This number could be a clue. Let’s keep it in mind.
Step 4: Email Enumeration with Holehe
Now let’s use Holehe to find which platforms this email is registered on:
1
2
3
4
5
6
7
8
9
10
$ holehe sra9lkikat2025@proton.me
******************************
   sra9lkikat2025@proton.me
******************************
[+] komoot.com
[+] protonmail.ch / Date, time of the creation 2025-12-07 00:26:22
[x] discord.com
[x] instagram.com
[x] github.com
... (121 websites checked)
Two important findings with [+] (confirmed):
- Komoot - A platform for outdoor activities
- Protonmail - Account creation date: 2025-12-07
Step 5: Finding the Komoot Account
Visit Komoot and create an account to investigate. When viewing profiles, notice the URL structure:
https://www.komoot.com/user/3191275598745
The profiles use numeric user IDs! Remember that number from Bluesky? 5426839678451
Let’s try replacing the ID:
https://www.komoot.com/user/5426839678451
 The hidden Komoot profile with the flag
Bingo! We found an account named “kika lover” with the flag in the bio!
TL;DR for Experienced Players
Multi-platform OSINT investigation. Sherlock username enumeration → Tumblr for email disclosure → Holehe email enumeration finds Komoot → Bluesky bio contains numeric ID → Use ID from Bluesky as Komoot user ID → Flag in bio. Classic OSINT chain requiring correlation of information across multiple platforms.
Flag: GCDxN7{tsarklti_m3a_rask_a_m3lam}
🎯 Misc Challenges
Insanity Check
Solves: 2
Category: Misc
Difficulty: Medium
Description
drab lik chi dora f discord t9ad tl9a chi haja robama ?
mtnsach hta links wla ay 7aja li katdi l bra(Translation: Take a look at the Discord, maybe you can find something?
Don’t forget about links and other things that lead to the outside.)
Attachment: Discord server invite link
Solution
This challenge tests your knowledge of Discord’s features and your ability to think creatively about where information might be hidden. The description hints at looking for “links and things that lead to the outside”—a crucial clue!
Step 1: Initial Investigation
Join the Discord server using the provided invite link. At first glance, you’ll see:
- Several text channels
- Some images posted in channels
- Regular chat messages
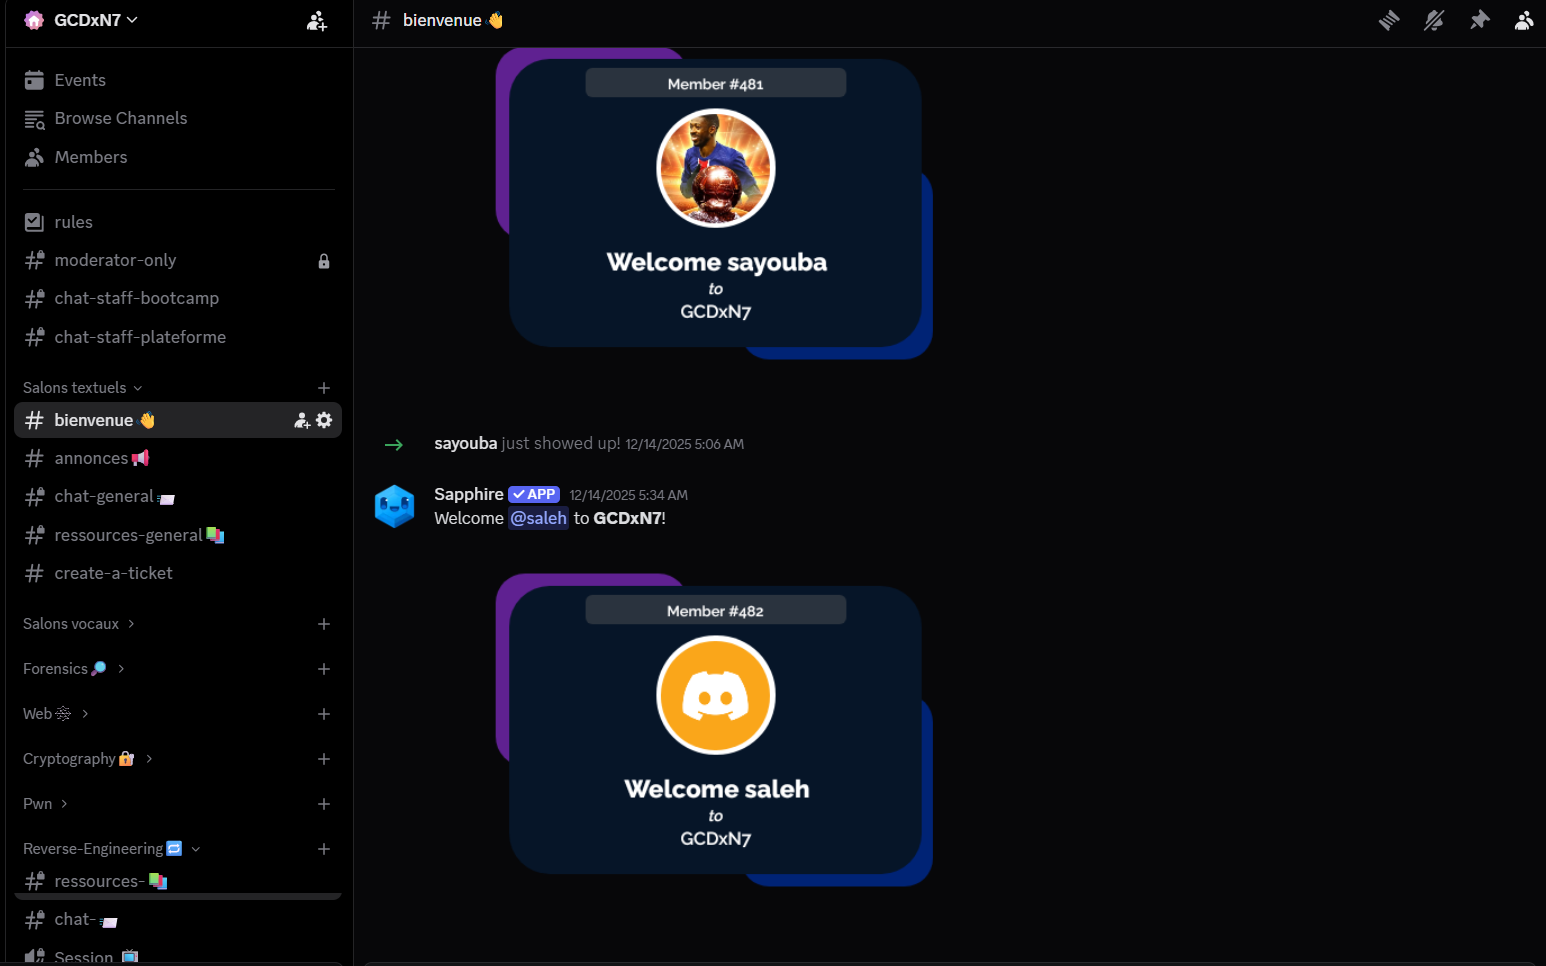 The initial Discord server
You might search through channels, images, and messages, but you won’t find anything obvious. This is where the “insanity check” begins—you need to think outside the box!
Step 2: Investigating Server Roles
The description mentions “things that lead to the outside.” What if there’s something hidden in an unexpected place? Let’s check the server roles.
You can view roles using several methods:
Method 1: Using BetterDiscord with RoleMembers Plugin
- Install BetterDiscord
- Install a plugin like “RoleMembers” or “ShowHiddenRoles”
- View all roles in the server
Method 2: Using Discord API
Access the server’s role list programmatically to see all roles, including hidden ones.
 Examining server roles
Among the roles, you’ll find a suspicious one: e3aKnAcy
Step 3: Recognizing the Discord Invite Pattern
Look at this role name carefully: e3aKnAcy
This is exactly 7 characters long—the same length as Discord invite codes! Discord invite links follow this format:
discord.gg/XXXXXXX(7 characters after the slash)discord.com/invite/XXXXXXX
Could this role name actually be a hidden Discord invite code?
Step 4: Accessing the Hidden Server
Let’s test our theory. Navigate to:
https://discord.gg/e3aKnAcy
 Joining the hidden “kika” server
Success! This brings us to a hidden server named “kika”!
Step 5: Finding the First Half
In the hidden server, there’s an announcements channel. Opening it reveals:
 First half of the flag
The message contains: i_ach_dak_l_hadchi_a_7madi??}
This looks like the second half of a flag. We need to find the first part!
Step 6: Finding the Second Half
The hidden server also has an images channel filled with many images:
 Channel with multiple images
Checking through the images one by one is tedious, but necessary. At image position 67 (You see what i did here hehe), you’ll find an image containing:
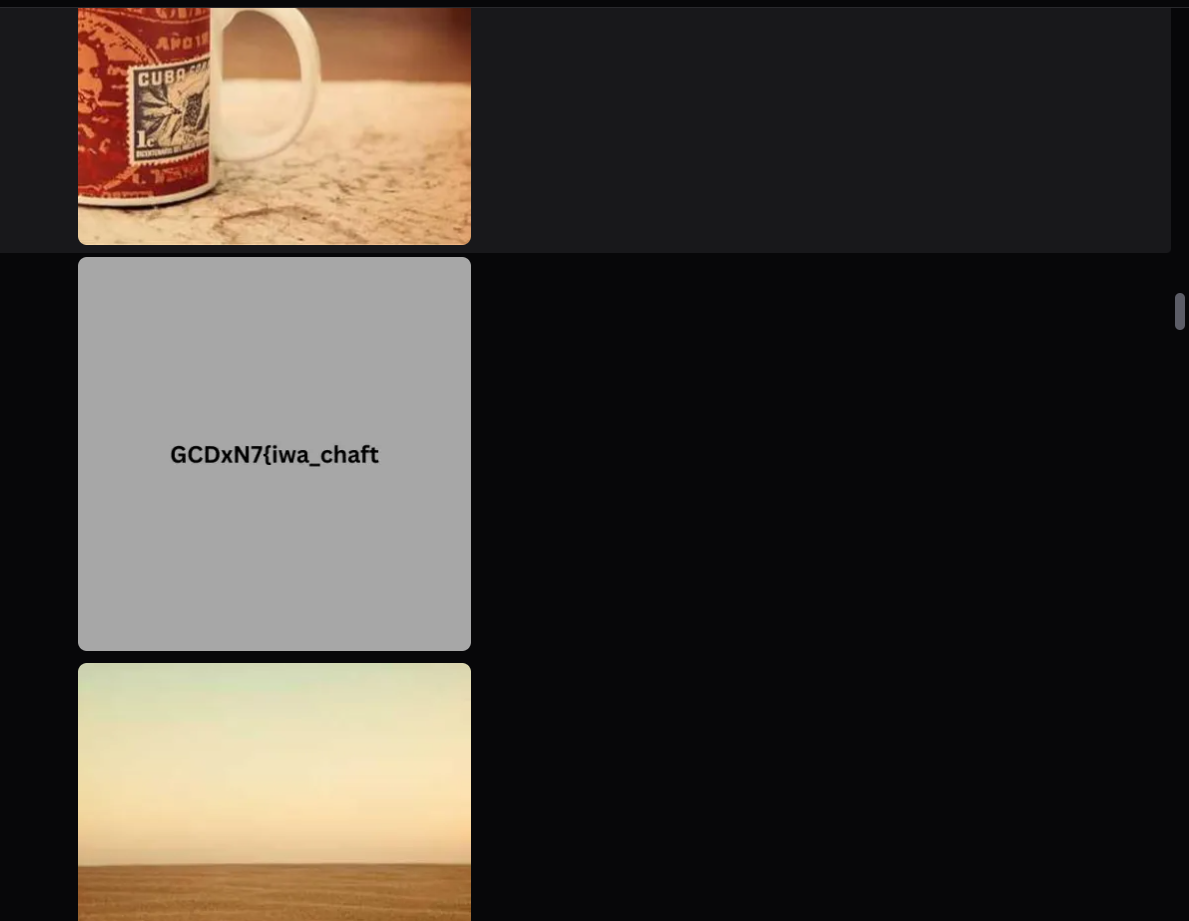 The first half hidden in an image
GCDxN7{iwa_chaft_
Step 7: Combining the Flag
Now we have both parts:
- First half:
GCDxN7{iwa_chaft_ - Second half:
i_ach_dak_l_hadchi_a_7madi??}
Combine them to get the complete flag!
TL;DR for Experienced Players
Discord server challenge with multi-layer hiding. Check server roles for a suspicious name matching Discord invite code format (7 chars). Use the role name e3aKnAcy as invite code to access hidden server. First flag half in announcements channel, second half in image at position 67 in images channel. Combine both parts for complete flag.
Flag: GCDxN7{iwa_chaft_i_ach_dak_l_hadchi_a_7madi??}

Conclusion
Creating these 9 challenges for GCDXN7 across Reverse Engineering, OSINT, and Misc categories was an incredible learning experience. Each challenge was designed to teach specific skills while maintaining an engaging and educational experience for players.
Key Takeaways:
- Reverse Engineering: Covered a wide spectrum from beginner-friendly XOR challenges to advanced Go binary obfuscation with multi-stage validation
- OSINT Techniques: Demonstrated practical investigation skills including reverse image search, social media enumeration, geolocation via WiFi databases, and hidden Discord features
- Problem-Solving Approaches: Emphasized breaking down complex problems into manageable components, understanding data flow, and knowing when to use brute force vs. analytical solutions
- Tool Proficiency: Players gained hands-on experience with industry-standard tools like Ghidra, JADX, Frida, UPX, and various OSINT platforms
I hope these detailed writeups help you understand not just the solutions, but the thought process behind solving each challenge. The goal was to create challenges that are both challenging and educational, pushing players to learn new techniques while having fun.
If you have any questions, alternative solutions, or want to discuss the challenges further, feel free to reach out!
Resources
- CTF Name: GCDXN7 CTF
- Challenge Categories: Reverse Engineering (6), OSINT (2), Misc (1)
- Total Challenges Created: 9
- Tools Used: Ghidra, JADX-GUI, Frida, UPX, DiE, Sherlock, Holehe, WiGLE, BetterDiscord
- Target Audience: Beginner to Advanced